 Tile Drenching: The Bold Interior Design Trend of 2025
What is Tile Drenching?
Tile drenching is a bold interior design trend where the same or matching tile is used continuously across both vertical and horizontal surfaces — usually walls, floors, and sometimes ceilings. It's a technique that creates a visually immersive, monochromatic look, often found in bathrooms, kitchens, entryways, and outdoor spaces.
Rather than using tile only as a backsplash or flooring accent, tile drenching turns an entire space into a unified, textural visual statement.
Pros and Cons of Tile Drenching
Why would you want to use Tile Drenching?
- Cohesive Aesthetic: Creates a seamless, luxurious look.
- Expands Perception of Space: Using the same tile across surfaces can make a room feel larger and more open by removing visual breaks
- Flexibility in Mood Setting: It’s a technique that adapts well to many styles — from ultra-modern to Mediterranean.
What are the possible downsides of Tile Drenching?
- Cost: Can be expensive due to large tile coverage and labor.
- Monotony Risk: If not done carefully, the space can feel overwhelming or sterile.
- Labor-Intensive Installation: Tile drenching requires precision and skill, especially in corners, edges, and transitions.
- Design Rigidity: Tiles aren't easily swapped out when trends change
Design Approaches
1. Minimalist Monochrome Bathroom
Use matte-finish square tiles in a neutral tone (gray, beige, or white) for a calming spa-like feel.

This minimalist bathroom uses floor-to-ceiling gray tiles for a uniform, calming aesthetic.
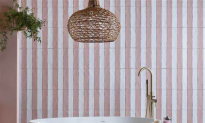
2. Pattern Play
Use patterned tiles to inject vibrancy into a small bathroom or laundry space.

Bold patterned tiles add visual interest without breaking the flow.
3. Natural Stone Elegance
Marble-look porcelain or real stone tiles used across the room add luxury and texture.

The veining in marble adds depth, making the space feel luxurious and warm.
4. Bold Color Immersion
Color-drenching with tile — especially deep greens, navy, or terracotta — creates dramatic, mood-rich spaces.

Vibrant green tiles envelop this bathroom in energy and personality.
5. Outdoor Spa Vibes
Tile drenching isn’t just for indoors. Use it in showers, patios, or pool houses for a luxury resort feel.

An outdoor shower clad entirely in stone-look tile feels luxurious and practical.
Average Cost of Tile Drenching
|
Item |
Average Cost (USD) |
|
Tile Material |
$5 – $25 per sq. ft. |
|
Installation (Labor) |
$8 – $20 per sq. ft. |
|
Prep + Waterproofing |
$1,000 – $2,500 total |
|
Total Room (Small Bath) |
$4,000 – $12,000 |
Prices vary based on tile choice (ceramic, porcelain, marble), room size, labor costs in your area, and whether it's new construction or a renovation.
What Drives the Cost of Tile Drenching?
Several factors contribute to the total cost:
|
Factor |
Typical Impact on Price |
|
Tile material |
Low to high depending on type |
|
Labor complexity |
Can double costs |
|
Surface area covered |
More tile = higher price |
|
Demolition & prep work |
Adds time and cost |
|
Waterproofing layer |
Crucial for wet areas |
|
Layout/design intricacy |
Custom patterns increase labor |
Let’s explore how you can reduce each of these costs step-by-step.
1. Choose Budget-Friendly Tiles
Save on materials — not on looks.
- Use ceramic instead of natural stone or marble.
Ceramic tiles are significantly cheaper and come in finishes that mimic stone or even high-end terrazzo. - Go for standard sizes (like 12x12 or 24x24).
Custom or mosaic tiles are harder to install and often waste more material.
Pro Tip: Shop outlet stores, tile liquidators, or clearance sections for overstocked designer tiles.
2. Tile Half the Wall Instead of Floor-to-Ceiling
You don’t have to tile everything to get the effect.
- Do a 4-ft wall tile and use paint above it — this still gives the immersive effect at eye level.
- Accent one wall (like behind a vanity or shower) while keeping other walls basic.
This reduces the square footage and cuts labor time.
3. Keep the Design Simple
- Stick to a single tile shape and layout (like horizontal or stacked grid).
- Avoid tricky patterns like chevron, herringbone, or custom curves, which require precision and more labor hours.
4. DIY Where You Can
If you’re handy, consider:
- Demolishing and removing old tile yourself
- Prepping the surface or installing backer board
Just leave the tiling to the pros to ensure waterproofing and alignment are perfect.
5. Reduce Waste with Smart Planning
Order just 10–15% more tile for cuts and errors (not 25–30%).
- Use a tile calculator
- Layout your cuts in advance
- Save scraps for areas like the back of a vanity or inside shower niches
6. Bundle Labor or Shop Around
- Get multiple quotes — prices vary significantly by installer.
- Bundle your tiling with other projects (e.g., plumbing or vanity install) to negotiate a better deal.
Also, look for smaller or independent tile pros who may offer lower rates than big box contractors.
7. Use Lookalikes or Alternatives
- Large-format waterproof vinyl tiles or tile-look wall panels can mimic tile drenching at a fraction of the cost.
- Consider tile paint for a drenching-inspired look in low-traffic areas.
Potential Savings Breakdown
|
Tip |
Estimated Savings |
|
Use ceramic instead of marble |
$3–$10/sq. ft. |
|
Tile halfway up walls |
30–40% material + labor saved |
|
Simple layout |
10–15% on labor |
|
DIY prep |
$300–$1,000 |